Sunday, April 29, 2007

Happy Birthday, Bianca

Today I did my first cake for an actual person. My friend, Bianca turned 21 today and I thought it would be nice to make her a chocolate brownie cake. (Come on, the recipe is from Emeril -AKA the God of Kitchens! LOL! It just simply CANT be bad, right?)

I used the buttercream recipe that accompanies the cake for the main body. I figure they're paired together for a reason. :) Then I mixed another batch for the borders and decoration. I used
this recipe but altered it slightly. I used 1 1/2 tablespoons of milk instead of EIGHT! Even half that would have made it a soupy mess.

I rushed it... mixed, baked, cooled, mixed again (icing), iced, and decorated all in under 3 hours. It was pushing it. Not something I like to do.

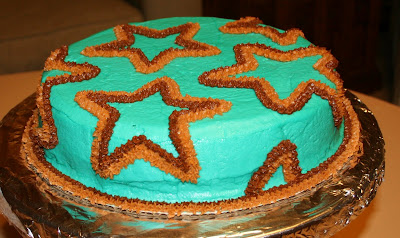
Here's the final result:


The chocolate icing had a good flavor but was anything but appropriate for decorating. Putting that stuff in a piping bag would be about as useless as a milk bucket under a bull so I just slapped it on the cake. The pink icing had a great flavor. I will definitely be trying the recipe for my next cake. It's easier than the other buttercreams I've been using and tastes a lot better too. Also, it was pretty easy to work with. The texture worked well in the bag.


As per being me, I did have some issues. I trimmed the cake layers and just about lost them both because they were super moist to the touch. I didn't get the cake exactly square. (Hey, it's an OCD thing... I "need" them all to be perfect. Of course, I have that Aries thing too where if it's not, I'll only be upset for a while and then get bored with it and move on. Haha!)

The writing on this one was better than the last cake I did... but I ended up having to remove two of the "s" swirls and flip them around to get the words to fit. In retrospect, I should have left the "21st" off since it was such a small cake. It was slightly lop-sided after putting the icing in the middle. (How the heck do you keep the layers from sliding against each other once they have the icing acting as a lubricant between them?)

I'll admit I'm freaked about the actual taste and texture of the cake. The main reason I try different recipes is because I know my family and I are going to be the ones eating it and I can judge the actual food quality of the cake before giving it to anyone else.

We tried the trimmed pieces earlier with the icing. My husband said the cake was dry but I thought it was fine. I take into consideration that we got the very edges off a cake that was baked in dark, nonstick pans. (I don't know if I can actually bake in them... I have a feeling it's going to be trial and error until I learn the differences between the dark ones and the regular ones I have.)


Hopefully, if it completely sucks Bianca will be honest about it so I know to test and retest the recipe before making one for another person. Honestly though, the batter was delicious and it is, as I said, from Emeril. Emeril wouldn't steer us wrong, right? LOL!

Here's a pic of Bianca with her cake:


She's so tiny... ... ... or I'm just huge... ... ... or probably a little of both. :)

Friday, April 27, 2007

Sweet Escape

Before I get started on this week's post, I have say that I got my certificate for completing my Wilton Course One this week.
Woo Hoo! I'm a Wilton C1 graduate.
And you thought you were all something with that Harvard Law Degree. HAH!


Fear my mad beginner cake stylin' skills bitchez!!


***Moving On***


So, this week I was determined to go more traditional. The cakes I'd made for class so far had been way out of the box when compared next to what we were "supposed" to do. I used the techniques we learned but just never fit into any kind of mold so I ventured out on the first two. Well, at it turned out, I didn't stick to anyone else's ideas this week either. I iced the cake in white. That's about where the traditional part stopped... even though I had every intention of making this one all "sweet and pretty." (HAH! I've never done "sweet and pretty" in ANYTHING... I don't know what made me think I would actually start now.)

In class this week, we learned (or attempted to learn) roses. I'll just say roses and I were not getting along last night and, after half an hour, I got frustrated and decided it would be better to move on to something else and come back to roses when I'm alone without distraction and am not under any pressure to produce something to put on a cake.

The plan was to make the cake straight out of the book, altering the colors in order to appease that "I hate NORMAL" voice inside me. I used Wilton's delphinium blue and kelly green. Blue roses? Sure, why not? After my attempts at making the roses went belly up, I practiced sweet peas and bows with the rest of the class and, in the end, just started adding stuff to the cake as I went along. The only thing I planned was the shell border along the bottom. The rest I made up as I went and this ended up being this week's final result:


The writing, after two attempts did NOT come out like I wanted. My handwriting, in my opinion, is normally OK. (Click here to take a look at my To-Do list for yesterday and to see what my normal, every day handwriting looks like.) And when I practice my icing writing on my practice board, it looks good for the most part. For some reason, I just didn't get this one down. Maybe it's a matter of more practice on an actual cake. I don't know. We'll see what happens as time goes on with the whole lettering issue.

I learned bows literally 5 minutes before I added them to my cake. Considering that, I would have to say "not bad" to the ones I pulled off. One was lower than the rest and my technique will get more refined as I go but, overall, I really liked the bows. I'm not too crazy about the gap that is left on some of them so I added the little blue stars in the middle just to make them look (to my eye, anyway) more complete.

Double shell borders bore me so I was stuck for a while on what to do on top. I added the sweet peas first. (Not perfect but not horrible, in my opinion... not bad for my first try.) The squiggles came later. I actually used to use squiggles as space filler a lot when I was majoring in graphic design in college. (Don't ask how I got from graphic design/web site building/desktop publishing to being obsessed with pastry arts in less than a year. I have no idea, but I am having a PHAN-TABULOUS TIME!)


As far as recipes go, this week I used a different cake recipe. (Thank you Betty Crocker.) I substituted Rum flavoring for the called for vanilla in order to make an Eggnog cake. (My hubby buys up eggnog by the gallon around Christmas and freezes it so his stash will last a bit longer. So, I figured he might enjoy such a cake.) The cake, like the other 2 was bready and dry. I read in my American Woman's Cook Book (an original print from 1941 that I got, literally, for less than 10 cents at an estate sale and would have paid $50 for) that I'm probably using too much flour. Ummm... it struck me that I was measuring then sifting instead of the other way around. Great! So, next week I'll try baking it correctly to see how it turns out.


I used a traditional Wilton recipe for the icing. I can't remember which one off the top of my head and it doesn't really matter because it sucked. Even adding a whole extra cup and a half of powered sugar didn't keep it in decent condition for decorating which, according to me and confirmed by my instructor, was one of the reasons I was having such a hell of a time with my roses. To be exactly accurate, it was OK until it softened from the heat of my hands. The other recipes I've used didn't "fall apart" from the warmth of my hands like this one did.


To compliment the eggnog cake, I flavored the icing with rum flavoring as well as with a bit of butter flavoring. Butter rum over eggnog? Hey, it sounded good to me. (Of course, what do I know? I'm an insulin dependent diabetic who hates the taste of most sweets. Again... how can I hate the taste of sweets and want to be a pastry chef? I know, I know... and the answer is: I don't know. LOL!)

The hubby said the flavors work well together. He liked the cake a lot and said the icing went well with it. I have to give him credit for trying it since he's not an "icing" person. Also, he's trying to lose a lot of weight and I keep asking him to try all these horribly fattening desserts. He's a trooper. After 21 years in the Army, he should be.


So, that's one more down with several thousand more to go. I start my Wilton Course 2 next week as well as the Fondant and Gum Paste class. Can't wait!

Friday, April 20, 2007

Inked Flowers

Well, this week I decided to try a technique I read about in my Wilton Course 1 book. It stated that by painting the inside of the bag, you can get a striped effect once you load the icing.

OK... so, yeah I got a striped effect but, honestly, I couldn't enjoy it because I was too busy throwing my icing bag across my kitchen. (Yes, I literally threw it when, after hours of trial and error... ok, more error than anything... I got so frustrated with the flowers I'd chosen to use on this cake.)


The overall is effect is this:


...which I can't say I'm too thrilled with.


Unlike my "Shoot for the Stars" cake, this week I used the buttercream icing recipe that is listed in our book. I used regular shortening instead of the butter flavored. The color came out as pure white, even though I used traditional vanilla flavoring. The taste was dramatically different than the butter flavored shortening recipe. I didn't notice the strong butter flavor of the star cake until compared directly with this week's recipe. The use of the regular shortening gave the icing batch a more pure sugar taste.


I saw this style flower in my course book and thought it would be cute to use with my planned pink/black/white coloring. I wanted something girly but tough if that makes any sense... you know, like wearing skulls covered in glitter. It's girly and feminine but has a bit of an edge to it.


I didn't put near as many flowers as I had planned and, to be completely honest, I didn't even finish the cake. By midnight I was tired and frustrated and after hours of redoing flowers I was done. The thing about this particular flower is that is works about 1 in 4 times when you have something to touch the tip to... when you have to do a "floating" flower in this style, it's just a disaster.


After trying about 30 times to get flowers around the base, I gave up. (And made a huge note in my chef's book that these are not the flowers to use when you a-need a large number of flowers, b-don't have a solid surface on which to anchor them, and c-are me.)


I DID like the colors on this cake. The pink came out better than I'd hoped. I used Wilton's Pink Rose and was expecting a light, girly pink. The color I got was fabulous for my purposes this week. It's an edgier pink, instead of something you'd see on a baby shower cake traditionally.


The effect of the black painted inside the icing bag was not what I expected but I like the possibilities on the technique. I plan on trying this technique on several other designs, such as borders and writing to see what happens. I'll post pics of those practice sessions once I'm done.


The initial plan for the flowers was to have some be totally white, some have just a tiny bit of black, and others have mostly black. As you can see above, I got the basic concept down. The form of the flowers is another story.


I did exactly the same thing I practiced in class and even softened the icing, followed by hardening the icing when the flowers just would NOT form the right way. Well, more accurately, they wouldnt let go of the icing tip. Like I said, if you have a solid base to set the tip against, the flowers do well about 25% of the time. If you try to make them floating above the surface (for instance, while putting them around the base on top of the shell border) that number drops to about 1 in 15.


Overall, I don't think I care for the black on white... at least not for this particular design. I think using the colors for borders may prove to be more attractive. I plan on trying it with my final cake for course 1 next week, using purple and blue striping. Hopefully, it will prove to be more appealing to the eye than the flowers from this week.


I don't think it was completely horrible. Being the perfectionist that I am, I tend to critique myself to the nth degree but I do see the positives as well. If I saw this in a bakery, my first reaction would probably be, "Oh, that's cute." It's not a masterpiece but I admit it doesn't totally suck. I'm proud of it... and even with the flinging of the icing bag across the kitchen, I had fun... which is, after all, the most important part of all of this.

Wednesday, April 18, 2007

Shoot for the Stars

This was my very first attempt at decorating a cake using actual bags and tips designed for that purpose. I call this one "Shoot for the Stars" and plan on using this same color scheme in a few weeks on a cake with a more contemporary design.


I used a butter cake recipe found here. The recipe calls for only 1 cup of granulated sugar and uses milk which I felt gave the batter an almost sour taste. My concerns about the lack of sugar were confirmed after baking when the cake seemed a little dull to me. Although the recipe called for vanilla, which I used, I still found the cake lacking in flavor.


I used the traditional Wilton Snow White Buttercream Icing recipe and substituted butter flavored shortening for the regular. I also omitted the almond extract, replacing it with extra vanilla instead. The shortening gave the batch of icing a light yellow tint which caused my colors to be slightly different than originally planned. I had some trouble with smoothing the overall icing out. I followed the instructions I was given on using waxed paper or a paper towel to create a smooth surface but the icing actually stuck to the paper and I spent an extra 5 minutes smoothing it out again. It seemed like the icing was actually melting and I thought that may be contributing to the problem so I put the cake in the refrigerator for about an hour until the icing firmed up a bit. (I was told later that I should never refrigerate a cake until it is completely decorated. I'm still not sure of the reason behind this but will be doing some research to learn why.)


I used Wilton icing colors in Teal and Brown. The teal came out slightly more to the green side than I thought I wanted but, in the end, I am really happy with the color. I will definitely be making a note of how the butter flavored shortening can work in my favor for future reference. The light brown was relatively easy to get but the dark brown used almost a full 1/2 ounce of color. Using that much coloring also gave the icing a unsatisfactory taste. (Not something most people would probably notice but with my palate, I certainly did.) Some people will say that Wilton Buttercream is unsatisfactory to begin with and I would tend to agree but, in this case, the brown made it worse than normal.


All in all, I'm happy with my first creation. I think the colors came out really well and I think I got the overall effect I was going for. It's not your normal "Happy Birthday" cake with balloons and a rose or two. It's........ "me"...... which I'm happy about. I will be making another cake in a week and my goal for that is to get the icing a little smoother before decorating the whole thing. Also, I plan on using a scallop border of some sort as well as having lettering of some kind.


This looks like the beginning of a sweet friendship.